
How Do I Replace My Steering On A Gemini Catamaran
These are the instructions that were produced and distributed by Performance Cruising on how to replace mechanical boat steering on a Gemini Catamaran. These instructions are a step by step process on how it is performed. Also included you will find what parts you need based on your model and hull ID and basic tools needed. Since these instructions were introduced we have put together the complete boat steering kits containing all of the correct parts, in one box, that will get your project completed but do not include the tools required. If you go here you can view all of the kits as well as individual parts we offer for your replacement steering. If you prefer you can also download these instructions here.
Performance Cruising Inc. Gemini 105Mc How-To Series
Installing Replacement Steering Cables Version 1.5 – May 2003
Before getting started, thoroughly read the following instructions and review the suggested tools, materials, photos, and illustrations. Replacing the steering cables should take approximately 4 hours.
Replacement parts and complete steering kits can be ordered through www.boatingsolutions.com located in Arizona. Gemini hull numbers greater than 775 use the new Uflex Quick Connect system which enable replacing a single cable. Boats older than 775 use the older system and require upgrading the helm and both steering cables. If your hull number is within the range of 770 to 775 – check to see which cables you have before ordering.
The parts list and tools are listed below.
The two main components that never change are the helm and bezel kit.
1. #X34 – Bezel 90° Mount Steering Box
2. #T72FC – Dual Rotary Steering Helm
The next parts you will need are the steering cables which will vary based on model hull ID numbers listed above. You can choose the correct lengths below. All M66 replacement steering cables come with quick connect ends. So if you have a helm that is threaded vs a quick connect, then you should be replacing your helm as well or you can purchase the complete kit which includes helm, bezel and steering cables. See the models listed below.
105Mc Series Gemini:
3. Part #M66X19 – “Ultraflex”19’ steering cable (port)
4. Part #M66X14 – “Ultraflex” 14’ steering cable (starboard)
3400 and 105m Series Gemini:
5. Part #M66X18 - “Ultraflex” 18’ steering cable (port)
6. Part #M66X15 – “Ultraflex” 15’ steering cable (starboard)
Gemini models without transom steps:
7. Part #M66X17 - “Ultraflex” 17’ steering cable (port)
8. Part #M66X13 – “Ultraflex” 13’ steering cable (starboard)
Last is the tools required. These are the tools that were suggested when the instructions were produced and will complete the job for you. You may have an easier way with your tools, but we are just providing you with a reference.
Tools Required:
9. (1) Pair large vice grips
10. (1) Vise
11. (1) Felt-tip marker
12. (1) Adjustable wrench
13. (1) Standard screwdriver
14. (1) Phillips-head screwdriver
15. (1) Tape Measure
Let's get started on this project starting with step one.
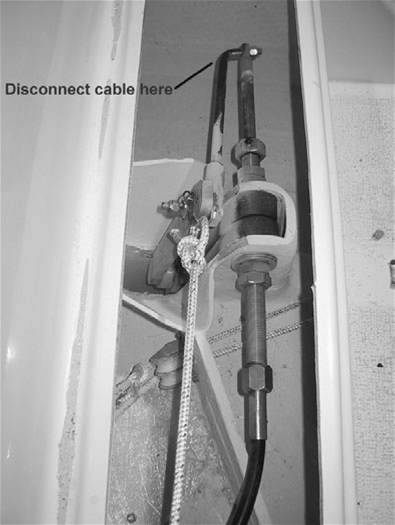
1. Remove old steering cables by first disconnecting the cables from the rudder assembly. Remove lock nuts and washers.
2. You will need to remove the inside access panels in both of the aft cabins to pull through the old steering cables. After removing the cover panels, you can begin to pull the cables through from each aft cabin. See Photo “M” In step 18 of access panel removed.
3. You will need to disconnect the refrigerator and move it forward to access the back of the steering box. After you have access, disconnect the steering cables from the steering box assembly.
4. Unpack the new steering cables and box.
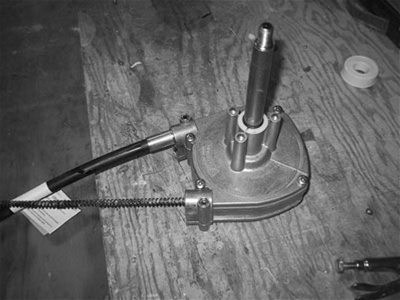
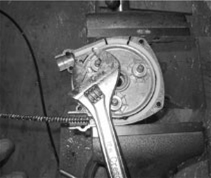
5. Start assembling the new steering system by inserting the longer cable into the left side of the steering box. Use the vice grips to turn the rod clockwise and thread the cable through all the way as shown in the photo “B”.
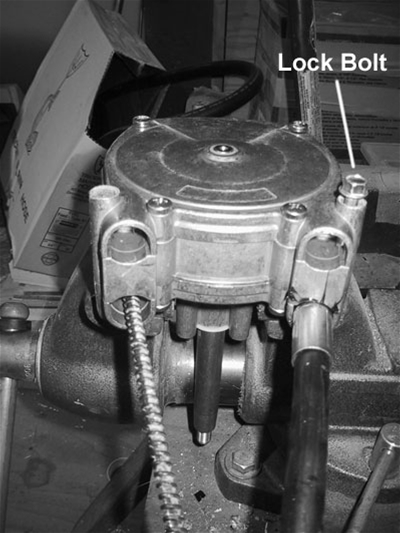
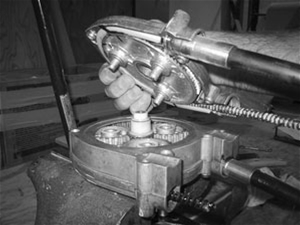
6. Flip assembly over and insert into vice to stabilize the box as shown in photo “C”.
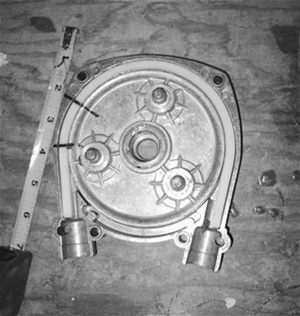
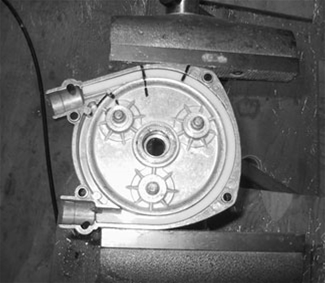
7. Take the cover plate off by taking out the (4) four screws and then use a flat-head screwdriver to gentry pry open the plate covering the internal gears as shown in photo “D”. Be sure not to disturb the position of the spindles while removing the plate. Simply pry open and gently lift straight up.

8. Use the marker to make a line on the plate indicating “center” as shown in photo “E”. Make a second line exactly 1 1/4” down from the first mark as shown in photo “E”. The mark should be extend from the outside housing of the plate to the inside wheel.
9. Place the plate in the vice as shown in photo “F” and turn the inside wheel counter-clockwise to the 1 ¼” mark on the outside housing.
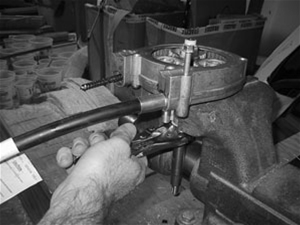
11. Remove the plate and starboard steering cable from the vice and replace with steering box with port side steering cable attached as shown in photo “H”. Using the vice-grips, begin turning the rod clock-wise until the cable stops – this will fully extend the tiller end of the cable.
12. Re-assemble the steering box and plate by inserting the plate spindles back into their gears – being careful not to turn the spindle positions. If necessary, turn the plate slightly to align the screw holes as shown in photo “I”. Once the plate is in position, replace the (4) four screws that hold the plate in place.
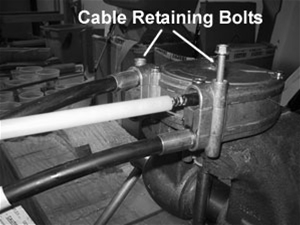
13. Reinstall the cable retaining bolts and apply waterproof grease to the both the left and right tube retainer fittings as shown in photo “J”. Greasing the retainer fittings should be part of the normal maintenance schedule.
14. Check the travel of the tiller-end of the both cables to make sure they both extend to the same length as shown in photo “K” – in this case, each end is extended to 9 ¼”
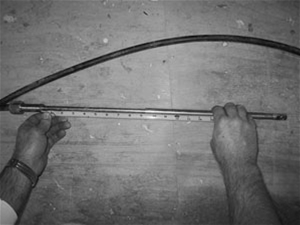
15. Use the vice-grips, turn the steering rod on the cable box all the way in the opposite direction to check the measurement on the port-side steering cable. It should measure the same as the starboard side with fully extended – in this case 9 ¼”.
16. Remove old steering box.
17. Secure the cables nuts by taping them into place so that you do not lose them while threading the cable through to the rudder step as shown in photo “L”.

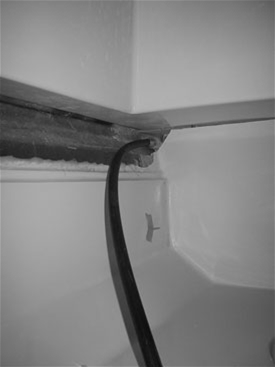
18. When installing the new steering cables, first install the shorter cable (fully retracted), in this case the starboard cable. A fully extended cable will not fit in the rudder step until it is in place. The 19’ cable goes to the port side, the 14’ cable goes to the starboard side. There is a channel underneath the cabin doorway through which to feed the port cable. Photo “M” shows feeding the port cable through the back of the port aft cabin through to the rudder step. The cover panel has been removed for access. The cable is then passed through the aft locker and into the rudder step.
Older model Gemini’s may require drilling or cutting out access holes for feeding the new Uflex cables.
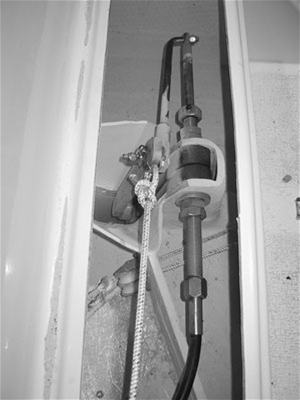
19. Reconnect the steering cable to the rudder assembly in the rudder step as shown in photo “N” – showing starboard rudder.
20. Before connecting the starboard cable, be sure to turn the wheel completely to the opposite direction to retract the cable extension.
That should complete the removal and install of your Gemini Catamaran mechanical steering system. If you have any questions please contact us
